Making an MSX font
I figured, for this and future posts I have planned about MSX, that I wanted an MSX font face. I browsed the web a bit for one and found nothing that I liked. So decided to create one.
I’m pretty sure I’ll be violating someone’s copyright here, because I won’t be making an MSX-inspired 8-bit looking font. I am going to build THE EXACT FONT that the MSX 1.0 I grew up with had. I just hope the copyright owner will let this pass, given how “valuable” this font is nowadays and that I won’t be making a cent from this. If he or she is not OK, though, I’ll comply with their request.
Let’s rip the bitmaps
I started with an MSX program to print all characters. MSX had a character set of more than 256 entries. Most occupied 1 byte, but 32 of them were 2-byte sequences that began with 0x01. So, I wrote this short program inside an emulator to obtain all the characters:
10 SCREEN 1: WIDTH 32
20 FOR I=0 TO 255
30 X=I MOD 32: Y=I \ 32
40 C=I
50 IF C<32 OR C=127 THEN C=32
60 LOCATE X,Y: PRINT CHR$(C)
70 LOCATE X,Y+10: PRINT CHR$(1)+CHR$(C)
80 NEXT I
Running that gave me this:
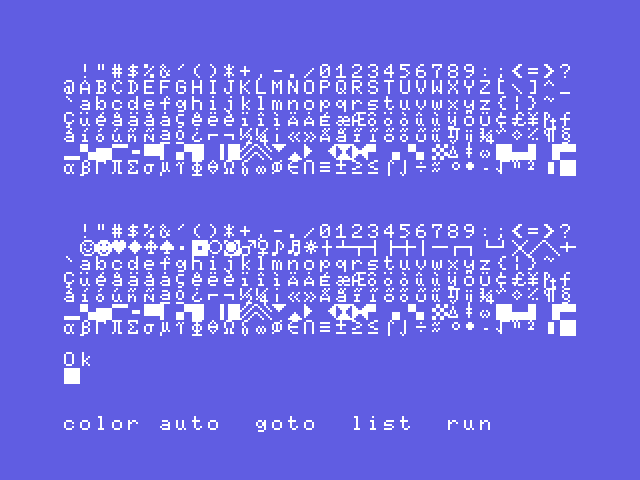
Note that both blocks of characters look the same except for the second row.
I set the goal of not repeating myself for this task (or any task, for that matter), so cutting each character in that picture by hand was ruled out. I opened up the manual of GraphicsMagick to find a way to do it all at once and, as expected, there was one. By running:
gm convert -crop 8x8 fullwidth-singlebyte.png +adjoin single%03d.png
I quickly got a bunch of 8x8 images. I did have to try a couple of times after cropping the original image in Gimp to keep just the characters. I also inverted and thresholded it to make it black & white and get this:
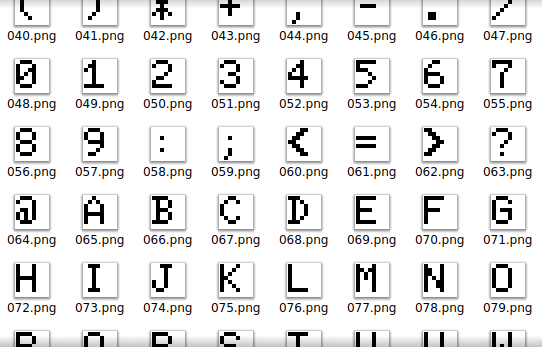
Inverted, thresholded & cropped to separate the characters
Vectorizing
Converting all images to SVG was easy, thanks to potrace. I had to upscale the images and play with the parameters for a while until I got the effect I wanted, which was to retain the blocky look of the bitmaps. The exact steps were:
for i in single*.png
do
    gm convert "$i" -filter Point -resize 32x32 "$i.bmp"
    potrace "$i.bmp" -a 0 -s -o singlebyte-svgs/"$i.svg"
    rm -f "$i.bmp"
done
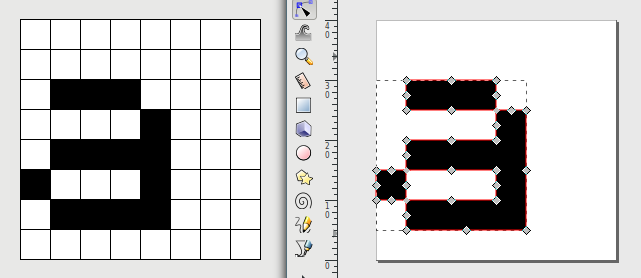
This is what I got for every character. Bitmap on the left, Inkscape on the right:
Character Map
Now, this part was tricky and there was no way to automate it, so I had to yield on the “don’t-repeat-myself” goal. MSX doesn’t use any character encoding known to iconv. And iconv knows A LOT of character sets. Characters from code 32 to 127 match ASCII, but after that, it’s the Wild West in there. The openMSX project includes a set of files called unicodemap..., but they map Unicode code points to row & column in the MSX keyboard matrix. That wasn’t good for me.
So I sat down and searched on KCharSelect & Gnome’s Character Map, or typed in when I knew how, or copied & pasted from openMSX’s map file until I converted this:
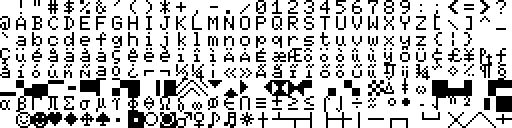
to this:
@ABCDEFGHIJKLMNOPQRSTUVWXYZ[\]^_
`abcdefghijklmnopqrstuvwxyz{|}~
ÇüéâäàåçêëèïîìÄÅÉæÆôöòûùÿÖÜ¢£¥₧ƒ
áíóúñѪº¿⌐¬½¼¡«»ÃãĨĩÕõŨũIJij¾∽◇‰¶§
▂▚▆▔◾▇▎▞▊▕▉▨▧▼▲▶◀⧗⧓▘▗▝▖▒Δǂω█▄▌▐▀
αβΓπΣσμτΦθΩδ∞φ∈∩≡±≥≤⌠⌡÷≈°∙‐√ⁿ²❚■
☺☻♥♦♣♠·◘○◙♂♀♪♬☼╂┻┳┫┣╋┃━┏┓┗┛╳╱╲┿
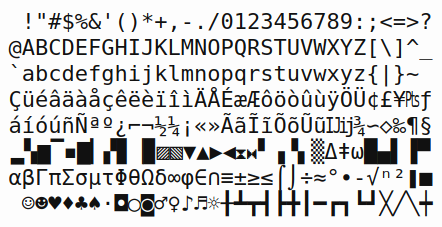
With that textual version, encoded in UTF-8, I could now map, automatically, the Unicode codepoint of each character to its vectorized face in SVG. I had to make some compromises in the process:
- There were several characters that I couldn’t find in Unicode, like UPPER THREE QUARTERS BLOCK (code 197) and RIGHT THREE QUARTERS BLOCK (code 202). So I used left & right seven-eighths blocks instead.
- The same happened with the very last character in the bitmap above (code 1 + 95), a box-drawing glyph, which has a full width horizontal line with a smaller vertical line crossing it. I replaced it with a HEAVY HORIZONTAL LIGHT VERTICAL and used HEAVY box drawing chars for the other drawing chars.
- Ditto with its rotated version, code 1 + 80.
- Characters 203 & 204, full block diagonal fills, were replaced by squares with diagonal fills. This decision was made by openMSX.
- I wasn’t sure whether some letters are upper or lower case, like pi (π), or theta (θ). I’m not sure either what’s the character between INFINITY (∞) and ELEMENT OF (∈). I checked an old MSX Technical Data Book and it seems to be lowercase phi (φ), but it certainly doesn’t look like it.
These problems are not a big deal. If I use my font, everything will look perfect. But it would be cool to be able to correctly decode MSX text into the proper character, so that even with different fonts, the desired text was displayed.
Making the font

Now, when I started, I didn’t know how I was going to achieve my goal of not doing repetitive chores when it came to loading each character to the font in FontForge. I did know, however, that there would have to be a way, because I WAS NOT going to load more than 250 characters one by one. And if there wasn’t, that was going to be the end of this project ;)
As you imagine, there was.
FontForge can be scripted in two languages. One of their own invention and Python. The API is documented in their site and they have examples. But for this post, I just want to show you this video, because it’s freaking awesome. Pause when the script appears to check the feel of the API.
FontForge is capable of importing SVG outlines for a scalable font, and its scripting API let me do all that in one go. Of course, I spent time tweaking the script. But the advantages of automating the process are obvious.
The Result
I repeated the last steps of the process for a narrower, 6x8 bits version of the same font that matches the way MSX looked on its screen 0. I also tweaked the fonts in FontForge to remove some unnecessary nodes included by Potrace and simplify and clean the outlines a bit. FontForge is still complaining about self-intersecting paths and the automatic hinting is not optimal in several glyphs. Anyway, type below to try them:
Type some text above. Switch to Screen 1 style.
And, after so much ado, here are the fonts:
2016-09-15 UPDATE: I have fixed several encoding errors & one missing character (~). I’ve chosen different codepoints for some characters, and I’ve automated the whole process, so now you can just get the code and run make to build the fonts. The code is here.